How to Wire a 3-Way Switch? 3-way switches are crucial when you want to control a light fixture from two different locations. They’re often used in staircases, hallways, or large rooms with multiple entrances. Although wiring a 3-way switch might seem complex at first, this step-by-step guide will help you understand the process with ease. This article covers all the essential steps, safety considerations, and tools needed to successfully wire a 3-way switch.
Table of Contents:
- Introduction to 3-Way Switches
- How a 3-Way Switch Works
- Tools and Materials Required
- Safety Precautions
- Step-by-Step Guide to Wiring a 3-Way Switch
- Step 1: Turn Off the Power
- Step 2: Identify the Switch Locations
- Step 3: Understand the Wiring Diagram
- Step 4: Install the First Switch
- Step 5: Install the Second Switch
- Step 6: Connect the Common Wires
- Step 7: Attach the Ground Wires
- Step 8: Test the Circuit
- Common Troubleshooting Tips
- FAQs About 3-Way Switches
- Conclusion
1. Introduction to 3-Way Switches
A 3-way switch allows you to control a single light or fixture from two separate switches. Unlike a traditional switch with just an “on” and “off” position, a 3-way switch provides more flexibility. It’s a practical solution for spaces where you need multiple access points for lighting control, like hallways, staircases, or large living rooms.
2. How a 3-Way Switch Works
Understanding the basics of how a 3-way switch operates is key. In a 3-way circuit, you have two switches that connect through traveler wires, along with a common wire that supplies power or connects to the light fixture. The switches are designed so that flipping either one can toggle the light on or off, regardless of the other switch’s position.
3. Tools and Materials Required
Before starting, gather the following tools and materials:
- Voltage tester
- Screwdriver set
- Wire strippers
- Electrical tape
- Wire connectors (wire nuts)
- 3-way switches (two)
- 14/3 or 12/3 cable (depending on the circuit amperage)
- Electrical box
4. Safety Precautions
Working with electrical systems can be dangerous if proper precautions aren’t taken. Follow these safety tips:
- Always turn off the power at the circuit breaker before working on the switch.
- Use a voltage tester to confirm the power is off before touching any wires.
- Work in a well-lit area, and if needed, use a battery-powered work light.
- Follow local electrical codes and regulations.
- Consider hiring a professional if you’re unsure or uncomfortable with electrical work.

5. Step-by-Step Guide to Wiring a 3-Way Switch
Step 1: Turn Off the Power
Locate your home’s main electrical panel and switch off the breaker controlling the circuit you’re working on. Use a voltage tester to verify there’s no current running to the switches or fixtures.
Step 2: Identify the Switch Locations
Determine the locations where you’ll install the two 3-way switches. Typically, this setup is used at opposite ends of a hallway or in different parts of a large room.
Step 3: Understand the Wiring Diagram
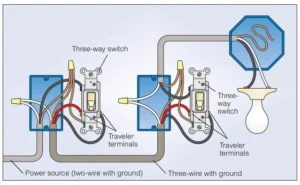
It’s crucial to visualize the wiring setup before getting started. In a typical configuration, there’s a line (power source), two 3-way switches, and a load (light fixture). The power can come into the first switch, run through the travelers to the second switch, and finally connect to the light.
Step 4: Install the First Switch
In the first switch box, connect the black (hot) wire from the power source to the common terminal of the switch (usually marked or colored black). The two remaining terminals are for the traveler wires, which will connect to the second switch.
Step 5: Install the Second Switch
At the second switch box, the black wire from the light fixture connects to the common terminal. The other terminals are for the traveler wires connecting back to the first switch.
Step 6: Connect the Common Wires
The common wire (black) in the first box carries power to the switch. The common wire in the second box connects to the light fixture. The traveler wires (usually red and black) link the two switches.
Step 7: Attach the Ground Wires
Ensure the ground wires from both switches are securely connected to the green terminal screws and joined with a pigtail to the metal electrical box (if applicable).
Step 8: Test the Circuit
Once everything is connected, restore power and test the switches. Flip each switch to confirm that the light turns on and off from both locations.
6. Common Troubleshooting Tips
If the light doesn’t behave as expected (e.g., it only works from one switch), check the following:
- Ensure the traveler wires are correctly attached to the appropriate terminals.
- Verify the common wires are correctly connected to the black screws.
- Inspect all wire nuts and connections to ensure they are secure and properly insulated.

7. FAQs
Q: Can I use regular single-pole switches in a 3-way setup?
A: No, you need specific 3-way switches that have three terminals: one common and two for travelers.
Q: What’s the difference between a 3-way switch and a 4-way switch?
A: A 3-way switch controls a light from two locations, while a 4-way switch allows control from three or more locations.
Q: Is it safe to wire a 3-way switch myself?
A: As long as you follow safety precautions and understand the wiring process, DIY installation is generally safe. However, if you’re inexperienced or unsure, consulting a licensed electrician is advisable.
8. Conclusion
Wiring a 3-way switch is a useful skill that gives you more control over your home’s lighting. While it may seem complicated initially, following this step-by-step guide simplifies the process. Always prioritize safety by cutting off power at the breaker and double-checking your work before restoring power. With the right tools and knowledge, you can easily install a 3-way switch and enjoy the convenience it offers.


